Anatomy in art is less about memorizing every muscle than about understanding how bone, weight, and movement create a convincing figure. Once that structure is clear, a drawing or painting gains presence even when the style is loose or expressive. In this guide I focus on the parts that matter most in the studio: what to study, which materials help, how to build a figure study, and where most artists go wrong.
The fastest way to read the figure is to build it from structure, not outlines
- Start with gesture, then anchor the rib cage and pelvis before adding muscles or facial detail.
- Use live models, plaster casts, and strong reference photos for different kinds of information.
- Graphite and charcoal are best for fast structure studies; ink, paint, and clay become more useful once the form is understood.
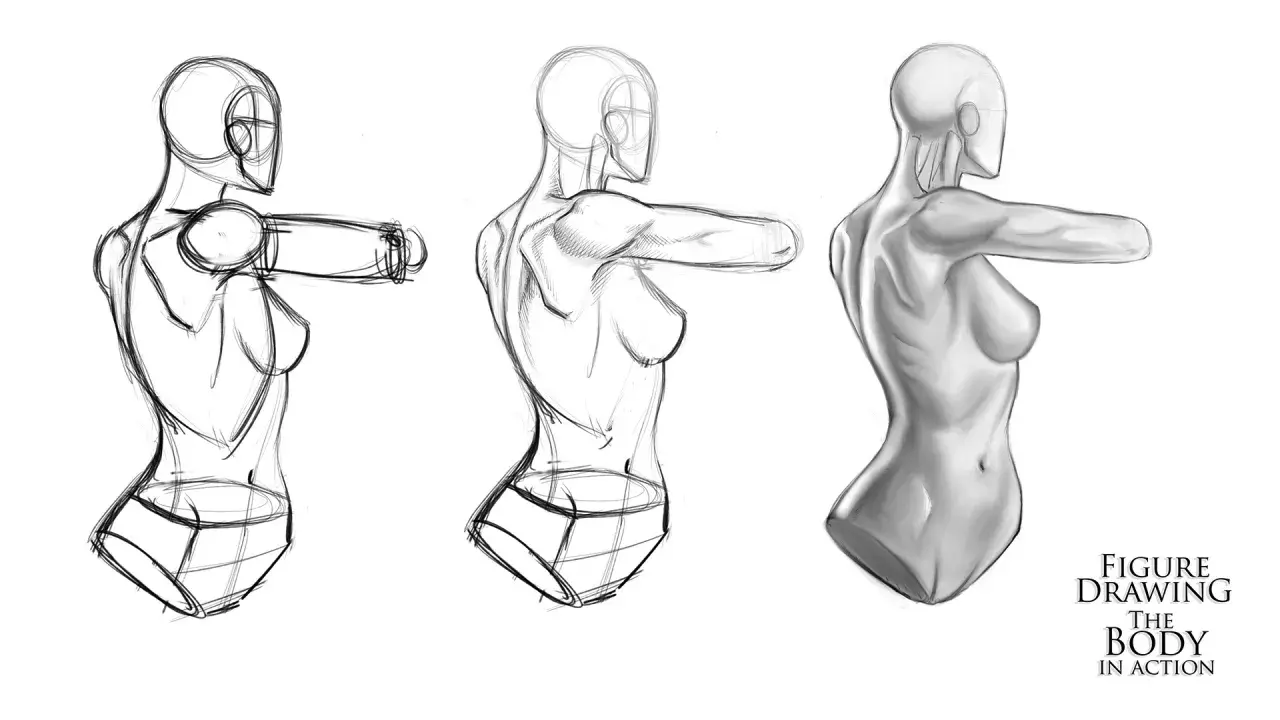
- Many weak figure drawings fail because the torso is built as a flat shape instead of two rotating masses.
- Heavier, acid-free paper and lightfast media help anatomical studies survive long enough to be reused later.
What anatomical study really means for an artist
When I talk about figure anatomy, I am not talking about turning the body into a medical diagram. I mean learning the parts that control movement and volume: the skeleton, the major muscle groups, the surface landmarks, and the way weight passes through the pose. That knowledge lets you draw a body that feels lived in rather than assembled from guesswork.
The biggest shift happens when you stop thinking in outlines and start thinking in forms. The rib cage is a barrel, the pelvis is another mass with its own tilt, and the limbs are not tubes so much as connected cylinders that bend, twist, and overlap. Surface anatomy matters because those bones and muscles create visible landmarks under the skin, but a good artist does not chase every tendon. I usually ask a simpler question: what is the body doing here, and where is the force going?
That approach also leaves room for style. You can simplify, exaggerate, or elongate the figure if the underlying structure still makes sense. Once that logic is in place, the work reads as intentional rather than merely decorative. From there, the next question is how artists historically learned that structure in the first place.
Why artists still build the figure from the inside out
The study of the body has always been tied to better observation. Renaissance artists pursued dissection, the careful examination of the body from the inside, along with measured proportion systems and direct study of the nude because they wanted bodies that could turn, twist, and bear weight convincingly. The Metropolitan Museum of Art notes that Leonardo da Vinci used methods borrowed from architecture, including plan, section, and elevation, to create a new visual language for anatomy. That matters because it shows the real goal was never memorization alone; it was a clearer way of seeing.
Today’s studio methods are less dramatic, but the logic is the same. A live model gives you movement and balance, a plaster cast or 3D model isolates form, and a well-made photograph helps with details you can revisit later. Each source solves a different problem. If I want action, I go to life drawing. If I want to check proportions or rework a section, I use a cast or a strong reference photo. If I want to understand a turn in space, I often rotate a simple 3D block before I touch the muscles.
Classical contrapposto, the weight-shift pose where the hips and shoulders counter-tilt, is a perfect reminder that anatomy is not static; it is choreography made visible. That historical and practical background is useful only if the material can carry it, which is where technique becomes the real deciding factor.
Which materials reveal the body best
Different media do not just change the look of a study; they change what you notice. Graphite is clean and precise, charcoal is fast and atmospheric, and paint forces you to think about value, edge, and temperature all at once. For sculptural thinking, modeling clay can be the most direct route because it turns anatomy into mass instead of line.
| Material | What it does well | Main limitation | Best use |
|---|---|---|---|
| Graphite | Clean construction, proportion checks, and controlled line | Can look timid if you never push value | Beginner studies, measured drawing, underdrawing |
| Charcoal | Broad masses, strong contrast, fast correction | Smudges easily and needs fixative | Gesture work, light-and-shadow studies, large sheets |
| Red chalk | Warm skin notes and elegant contour | Less forgiving if you overwork the sheet | Academic figure studies, toned paper |
| Ink | Confidence, rhythm, and strong edges | Corrections are limited | Contour studies, expressive line, final drawings |
| Watercolor or gouache | Color temperature and softer flesh transitions | Requires planning; less room for erasing | Painted figure studies, color notes, value control |
| Oil paint | Rich modeling, glazing, and subtle edges | Slow drying and more setup | Finished figurative painting, flesh passages |
| Clay or modeling clay | True volume, weight, and spatial clarity | Needs an armature and workspace | Sculpture, small study models, anatomical mass studies |
| Digital tablet | Layers, transforms, and fast iteration | Easy to rely on undo instead of observation | Concept art, revisions, pose exploration |
For paper, I prefer something heavier than a flimsy sketchbook sheet once the study gets serious. A sheet in the 160 to 300 gsm range handles charcoal, repeated erasing, and light wet media better than thin paper, and acid-free stock will age far more gracefully. If the study is meant to stay in the archive, that choice matters more than most artists think. Next comes the part that turns those materials into an actual workflow.
A workflow that keeps the figure believable
The safest way to build a figure study is to move from big to small. I start with gesture, then lock in the rib cage and pelvis as separate masses, then connect them with the spine and the major limb directions. Only after that do I add landmarks and muscle groups. If I reverse that order, the drawing may look busy, but it usually feels dead.
- Find the action line in 30 to 90 seconds. This gives the pose energy before details take over.
- Block the rib cage and pelvis as simple volumes. Their tilt and twist usually decide whether the body feels stable.
- Measure proportions with the head, shoulders, and limb angles. In academic figure work, the adult body often lands around 7.5 to 8 heads tall, but I treat that as a guide, not a law. A wingspan often sits close to height as well, though pose and body type can change that read.
- Place the landmarks that tell you where the structure is: clavicle, sternum, shoulder tip, ASIS (the front points of the pelvis), elbow, wrist, kneecap, and ankle.
- Wrap forms around forms instead of tracing muscles as isolated shapes. The body reads better when each part turns in space.
- Finish with light and edges so the anatomy feels like one body, not a checklist of parts.
One check I use often is the relationship between the rib cage and pelvis. If those two masses do not rotate correctly against each other, the whole pose will feel off even if the hands and face look perfect. That is why the torso usually deserves more attention than the arms or abs. Once that foundation is in place, the main failure points become easier to spot.
The mistakes that make anatomy feel stiff
Most weak figure drawings do not fail because the artist forgot the name of a muscle. They fail because the structure underneath is vague. The body is treated as a flat silhouette with decorative bumps, or each side is mirrored too literally, which kills weight transfer and rhythm. I see this a lot in studies that copy a single reference without really looking at the underlying volumes.
- Drawing muscles before masses makes the figure look labeled instead of built.
- Ignoring foreshortening, the visual compression that happens when a form points toward the viewer, makes limbs look the same length no matter where they sit in space.
- Overusing contour lines can flatten the body if value and overlap are missing.
- Rendering every area at the same intensity creates visual noise instead of hierarchy.
- Trusting one reference uncritically can freeze the pose and hide structural mistakes.
The fix is usually simple, though not always easy: simplify the body into planes, compare one side with the other, and keep asking what plane turns toward the light. If the study feels stiff, I do not usually add more detail. I remove detail until the weight and motion come back. That habit leads naturally to the question of which method fits which outcome.
Choosing the right method for the image you want
Not every anatomy study needs the same tools. A sketch meant to understand motion should be fast and forgiving, while a finished figurative painting or sculptural study needs more control over volume, edges, and surface. The best artists match the method to the job instead of forcing one medium to do everything.
| Goal | Best method | Why it works |
|---|---|---|
| Gesture and movement | Charcoal or soft graphite on medium paper | Quick marks let you capture action before it stiffens |
| Measuring proportion | Graphite, comparative sight-size drawing, and grid checks when needed | Clean lines make small errors easy to spot |
| Color and flesh | Oil, watercolor, or gouache, an opaque watercolor | These media show temperature shifts and subtle transitions |
| Three-dimensional structure | Clay, modeling clay, or digital sculpting | Volume becomes obvious as you turn the form |
| Concept art and iteration | Digital tablet with layered adjustments | You can test poses, proportions, and lighting quickly |
I also choose reference by task. Live models are best for balance, tension, and gesture. Photographs are useful for detail and repeatability, but they flatten some spatial cues. Anatomical plates and casts are ideal when I need to isolate a structure. If the goal is to draw a believable body rather than a literal copy, the smartest move is often to combine two or three reference types instead of relying on one.
There is one more practical layer that matters if you want the work to stay useful after the session ends: preservation.
How to keep figure studies useful years later
Figure studies age better when I treat them like part of an archive instead of disposable practice. I date the sheet, note the pose length or reference used, and keep the best drawings flat in acid-free folders away from sunlight and humidity. If the work includes charcoal, pastel, or soft graphite, I separate the sheets with clean interleaving paper so the surfaces do not transfer or scuff. If I know a study may later help with comparison or authentication, I also note the medium, support, and any corrections.
- Use archival or acid-free paper for important studies, especially if you plan to revisit them for composition or proportion.
- Scan finished sheets at 300 dpi minimum, or 600 dpi if line texture and chalk grain matter.
- Label the study with date, pose duration, and medium so you can track what improved over time.
- Choose lightfast pigments and inks, meaning colors that resist fading, if the work may travel or stay on display.
- Store wet-media work separately until it is fully cured, and keep fixative use light and even rather than heavy and glossy.
That record-keeping sounds fussy until you need to return to an old study for a painting, sculpture, or comparison. Then it becomes obvious that the drawing was never just a practice page. It was a working document about how the body is built, how it moves, and how you learned to see it clearly.