Hands are hard to draw because they combine structure, motion, and expression in one compact subject. When I study them, I am not just chasing an outline; I am tracking joints, planes, weight, and the story of the gesture. This article breaks down the anatomy landmarks, the mistakes that flatten a hand, and the methods and materials that make the subject manageable.
The quickest way to make hand studies feel manageable
- Hands read badly when structure, gesture, and perspective are handled as separate problems.
- The wrist, palm block, thumb base, and knuckle arc are the landmarks I check first.
- Flat palms, identical fingers, and delayed thumb placement are the fastest ways to lose the form.
- A simple three-pass process, gesture, mass, then refinement, keeps the pose believable.
- Materials help, but only when they make proportion checks and value grouping easier.
- Short, repeated studies beat long, exhausted sessions almost every time.
Why hand drawings break down so quickly
Hands are small enough to tempt you into rushing, but dense enough to punish every shortcut. The palm is not a flat slab, the fingers are not identical tubes, and the wrist changes the whole silhouette by tilting the hand like a hinge. The result is that a drawing can look almost right from a distance and still feel wrong at the joints or in the spacing.
What makes the subject difficult is not just anatomy. It is the combination of anatomy, perspective, foreshortening, and gesture all working at once. A relaxed hand, a clenched fist, and a hand reaching toward the viewer are three different construction problems, even though they belong to the same body part. That is why I treat each pose as a new setup rather than a repeat of the last study.
There is also a reason hands feel more unforgiving than many other parts of the figure: people read them immediately. We know what a hand should do, so even small errors in angle or proportion stand out fast. Once you accept that, the goal shifts from copying every wrinkle to building a form that can survive close inspection and still look natural.
The landmarks I check before I draw a line
Before I draw fingers, I map the wrist, the palm block, the thumb base, and the knuckle arc. Those landmarks stop the hand from drifting into a generic glove shape. I also keep the thumb separate in my mind, because it sits on a different mechanism from the fingers and bends with its own logic.
- Wrist - treat it as the pivot that sets the angle of the whole hand.
- Palm - think of it as a box or wedge, not a sheet.
- Knuckles - place them as a curved ridge, not a straight row.
- Thumb mound - keep it lower and more rotated than the other digits.
- Finger groups - group them into fans or pairs before refining each finger.
If I get those landmarks right, the drawing can survive a lot of later simplification. If I miss them, no amount of pretty line work fixes the pose. From there, the next question is usually which mistakes are causing the biggest damage.
The mistakes that flatten a hand fast
The most common error I see is a hand built from five evenly spaced sausages. That approach ignores the fact that fingers taper, bend at different rates, and overlap in perspective. A second common failure is treating the palm as if it were the same width and depth everywhere, which makes the hand look stiff and carved from foam.
| Mistake | Why it breaks the drawing | Better approach |
|---|---|---|
| Equal fingers | Removes natural rhythm and taper | Stagger lengths, spacing, and angles |
| Flat palm | Loses the volume under the fingers | Block the palm as a box or wedge |
| Thumb added last | It gets glued on instead of integrated | Place the thumb base early |
| Detail before structure | Nails and wrinkles distract from proportion errors | Lock the pose before texture |
| Ignoring foreshortening | The hand looks stretched toward the viewer | Use overlaps and shortened segments |
When a hand still looks off after all that, the real issue is often rhythm, not anatomy. The fingers may technically be in the right place, but if they all bend with the same energy, the pose goes dead. I usually fix that by deciding which finger leads the action, then letting the others support it instead of competing with it.

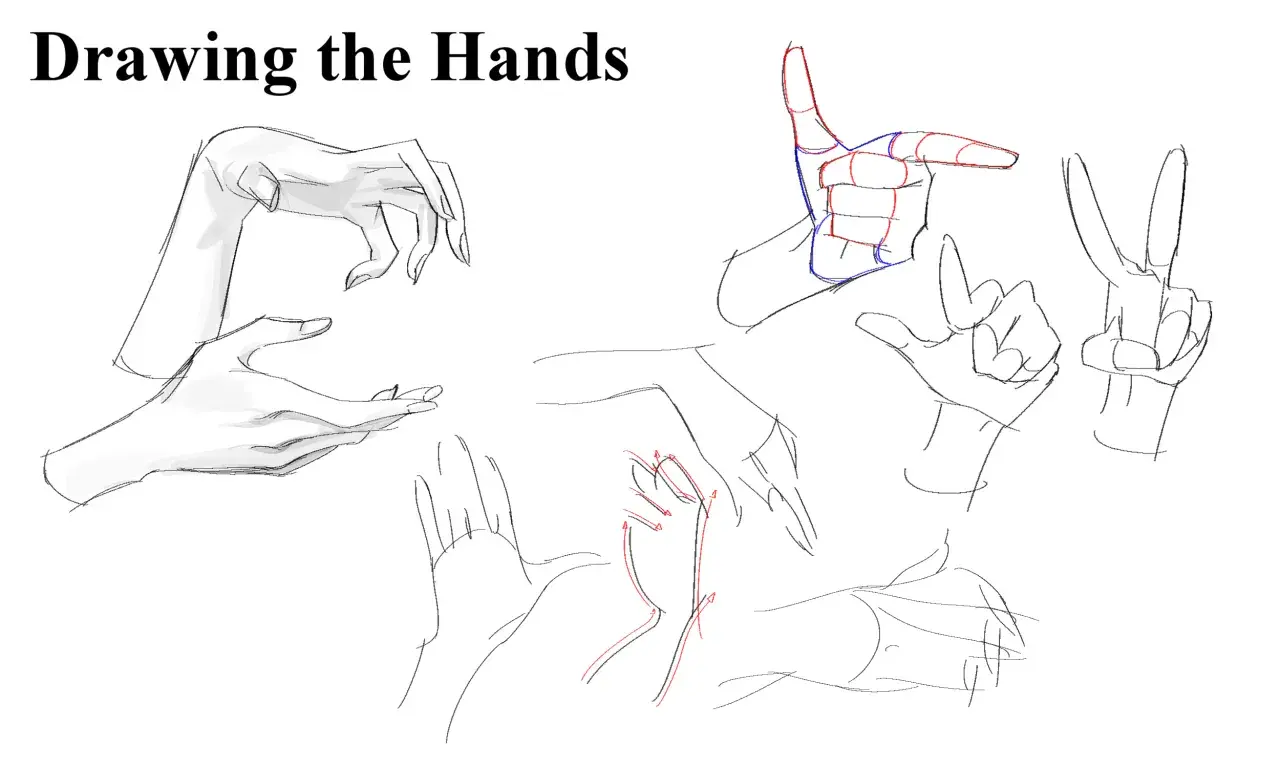
A construction method that keeps the pose believable
I usually build the hand in three passes: gesture, mass, and refinement. Gesture gives me the direction of the hand, mass gives me the volume, and refinement adds the anatomy that the pose can actually support. When I skip any one of those passes, the hand tends to wobble.
| Method | Best for | Strength | Limit |
|---|---|---|---|
| Gesture-first | Dynamic poses | Keeps the hand alive | Can get loose if I stop there |
| Box-and-cylinder | Beginners and foreshortening | Clarifies 3D form | Can feel mechanical |
| Contour-first | Careful observational studies | Helps me see the edge | Often hides weak structure |
- Block the wrist and palm as one connected unit.
- Place the thumb base before individual fingers.
- Draw the finger masses as a fan, not as parallel rods.
- Check overlaps and shortening before refining nails or creases.
- Finish with line weight and shadow grouping, not tiny textures.
The more the hand points at the viewer, the more I rely on ellipses and overlaps to keep depth readable. That is where foreshortening becomes less of a theory and more of a discipline. If I can read the hand in simple volumes first, the final drawing usually holds together.
Materials and study habits that make practice more efficient
Materials will not solve hand anatomy, but they can make the learning loop cleaner. For quick studies, I like a HB or 2B pencil and smooth paper because corrections stay visible and the construction lines do not get buried. If I want the hand to feel sculptural, I move to a softer pencil or charcoal so the shadow masses are easier to group.
| Tool | Why I use it | Best use | Limitation |
|---|---|---|---|
| HB or 2B graphite | Clear construction and easy corrections | Block-ins and proportion checks | Can tempt me to overfinish edges |
| Ballpoint or fineliner | Forces commitment | Line confidence drills | Hard to correct mistakes |
| Charcoal or soft pencil | Builds broad value shapes quickly | Shadow studies and form turning | Smudges and can hide structure |
| Reference photos or your own hand | Gives immediate feedback | Pose, proportion, and light studies | Can become passive if I only copy |
I also work with a single light source when possible. A strong side light makes the knuckles, tendons, and finger planes read clearly; flat overhead light hides too much. For practice, I prefer short sessions of 10 to 20 minutes with 3 to 6 hand studies, because a compact set of repetitions teaches more than one exhausted long study.
What I keep in mind when the hand still looks wrong
When a hand refuses to work, I stop asking for more detail and go back to the broad questions: where is the weight, where is the twist, and which finger is leading the motion? That reset usually exposes the real problem. Most of the time, the issue is not the finish; it is the construction underneath.
- Recheck the gesture before you redraw the outline.
- Compare finger lengths as groups, not one by one.
- Leave wrinkles and nails until the form reads from a distance.
- Use your own hand as a model, especially for thumbs, fists, and open spreads.
- Draw the same pose three times: loose, structural, and refined.
That last drill is especially useful. The first pass teaches movement, the second pass teaches volume, and the third pass shows whether the hand still works when you commit to finish. I do not expect perfection from every study; I expect clearer decisions from the next one.
The hand study habits I rely on when I want faster progress
The fastest improvement usually comes from alternating three kinds of practice: gesture sketches, block-in studies, and close observation of real hands. Gesture keeps the drawing alive, block-ins keep it believable, and observation keeps it honest. If I only do one of those, the work improves unevenly.
- Use 30-second or 60-second gestures to train the pose.
- Follow with 5-minute block-ins to place the wrist, palm, and thumb.
- Finish with a 10-minute study focused on light and plane changes.
If you keep returning to those three stages, hands stop feeling like a mystery and start feeling like a repeatable problem with variable answers. That is the point where the subject becomes less intimidating, not because it got simpler, but because you learned how to look at it in the right order.